How to Change CPAP Filters in 5 Easy Steps
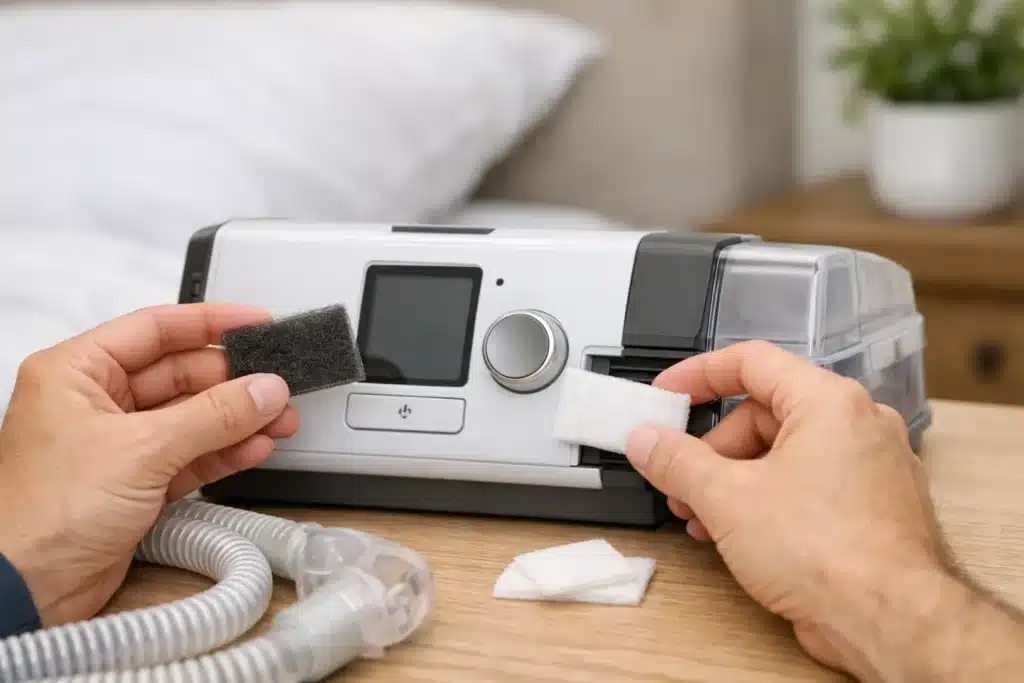
A CPAP filter is small, inexpensive, and easy to forget – until it is packed with dust, pet hair, or lint. Learning how to change CPAP filters helps protect your machine’s airflow, keeps the air intake cleaner, and prevents a simple maintenance task from becoming a frustrating equipment problem.
The good news is that most CPAP filters take only a minute or two to replace. The key is knowing which type your machine uses and never treating a disposable filter like a washable one.
Why your CPAP filter deserves attention
Your CPAP machine draws room air through an intake filter before it pressurizes that air and sends it through your tubing and mask. The filter is not the same thing as a medical-grade air purifier, and it does not replace regular cleaning of your mask, humidifier tub, and tubing. Its main job is to trap household dust and debris before they get into the machine.
When a filter gets dirty, airflow into the device can be restricted. Your machine may work harder than it should, and dust can build up inside over time. If you have pets, run a furnace or air conditioner frequently, live near a busy road, or sleep in a room that collects dust quickly, filters may need attention more often.
Clean equipment supports dependable therapy. It also protects the investment you made in a machine that helps you breathe and sleep better every night.
How to change CPAP filters safely
Before you start, check your machine’s user manual or look at the filter compartment. Filter locations differ by model, but they are usually found behind a small cover near the air intake on the side or back of the device. Have the correct replacement filters ready before removing the old one.
1. Turn off and unplug the machine
Stop your therapy and turn the CPAP machine off. Unplugging it is a simple precaution, particularly if you are cleaning around the device or changing a filter near the humidifier. You do not need to take apart the tubing, mask, or water chamber just to replace a filter.
2. Find the air filter cover
Look for a small plastic door, tab, or grille over the air intake. Open it gently. Do not force the cover, because the clips can be small and model-specific. If it will not open easily, pause and check your manual rather than prying at it with a tool.
3. Remove the old filter
Slide or lift out the old filter with clean, dry fingers. Take a close look at it. A disposable filter that appears gray, yellowed, fuzzy, bent, or visibly dusty should be thrown away. Do not shake it indoors and put it back in the machine. That only releases debris and does not restore the filter material.
If your machine has a reusable foam filter, it may look thicker than a disposable fine filter. Some models use one type, while others use both. This is why buying filters labeled for your exact machine matters. A filter that is too small, too thick, or installed backward may not sit properly in the intake area.
4. Clean a reusable foam filter only when allowed
Reusable foam filters can usually be rinsed under lukewarm running water with a small amount of mild soap. Rinse thoroughly until no soap remains, then gently press out excess water with a clean towel. Let the filter air-dry completely before putting it back in the machine.
Never install a damp filter. Moisture can be pulled into the device and cause damage. Do not use a hair dryer, put the filter in a dryer, or expose it to direct heat. Heat can warp the material and reduce its effectiveness.
Disposable paper or felt-style filters should not be washed. Once wet, they can lose their shape and filtering ability. Replace them instead.
5. Insert the replacement and close the cover
Place the clean, dry, correct-size filter into its slot. It should lie flat without folding, bunching, or sticking out from the edges. Close the filter cover securely, plug the machine back in, and start therapy as usual.
There is no need to change pressure settings after replacing a filter. If you see an unusual alert, hear a new noise, or notice a problem with airflow after installation, remove the filter and make sure it is seated correctly. If the issue continues, contact your equipment provider before trying to repair the machine yourself.
How often should you replace CPAP filters?
There is no single schedule that fits every household. Your machine manufacturer’s instructions should come first, but a practical starting point is to inspect the filter every two weeks and replace disposable filters at least monthly. Many CPAP users replace disposable filters more often when they look dirty or when their home has more dust, pet dander, smoke exposure, or seasonal allergens.
Reusable foam filters are commonly washed every two weeks and replaced about every six months, depending on the model and condition. If the foam is torn, stiff, discolored, misshapen, or does not come clean after washing, replace it sooner.
A clean-looking filter is not automatically a new filter. Fine particles can build up where they are hard to see. On the other hand, replacing a disposable filter every few days when it is still clean may be unnecessary. A regular inspection routine gives you a sensible middle ground.
Signs your CPAP filter needs changing sooner
Your calendar is helpful, but your filter can tell you a lot. Check it right away if you notice visible dust, pet hair, discoloration, a musty smell near the intake, or reduced airflow that is not explained by a mask leak.
You should also inspect the filter after home renovations, wildfire smoke, a move, a period of heavy pollen, or an illness that left your bedroom less tidy than usual. These situations can increase the amount of debris in the air around your machine.
If you use a CPAP device with a filter reminder, treat it as a prompt to inspect the filter, not as a reason to ignore what you can see. The reminder cannot know whether you have two shedding pets or a freshly cleaned, low-dust bedroom.
Common CPAP filter mistakes to avoid
The most common mistake is washing a disposable filter. It can look better after rinsing, but it is no longer reliable. Another is reinstalling a reusable filter before it is fully dry. Both shortcuts can create avoidable problems for your equipment.
Avoid vacuuming a disposable filter and reusing it. A vacuum may remove surface dust, but it can damage the fine filter fibers or leave trapped particles behind. Also, never run your CPAP without a filter, even for one night, unless your machine manufacturer or clinician specifically instructs you to do so.
Using generic filters can be fine only if they are designed for your exact make and model and fit properly. The lowest-priced option is not a bargain if it allows gaps around the intake or interferes with the filter cover. You deserve clear guidance and the right supplies, not guesswork.
Make filter changes part of your CPAP routine
Keep replacement filters in the same place as your distilled water, mask wipes, or other CPAP supplies. When you refill the humidifier or clean your mask, take a quick look at the filter. This keeps maintenance simple and prevents the familiar moment when you need a replacement at bedtime and cannot find one.
Set a repeating reminder on your phone for an inspection every two weeks. If you use disposable filters, add a monthly replacement reminder. Writing the date on the filter package can also help if more than one person helps manage your equipment.
If you are unsure which filter your device needs, if the cover is difficult to open, or if your machine still seems noisy after a change, ask for help. A clinician at CPAP One-Stop can help confirm the correct supplies and make sure your therapy equipment is working the way it should. A fresh filter is a small act of care that helps keep every night of treatment on track.